Presentations
Convert a Word document to slides
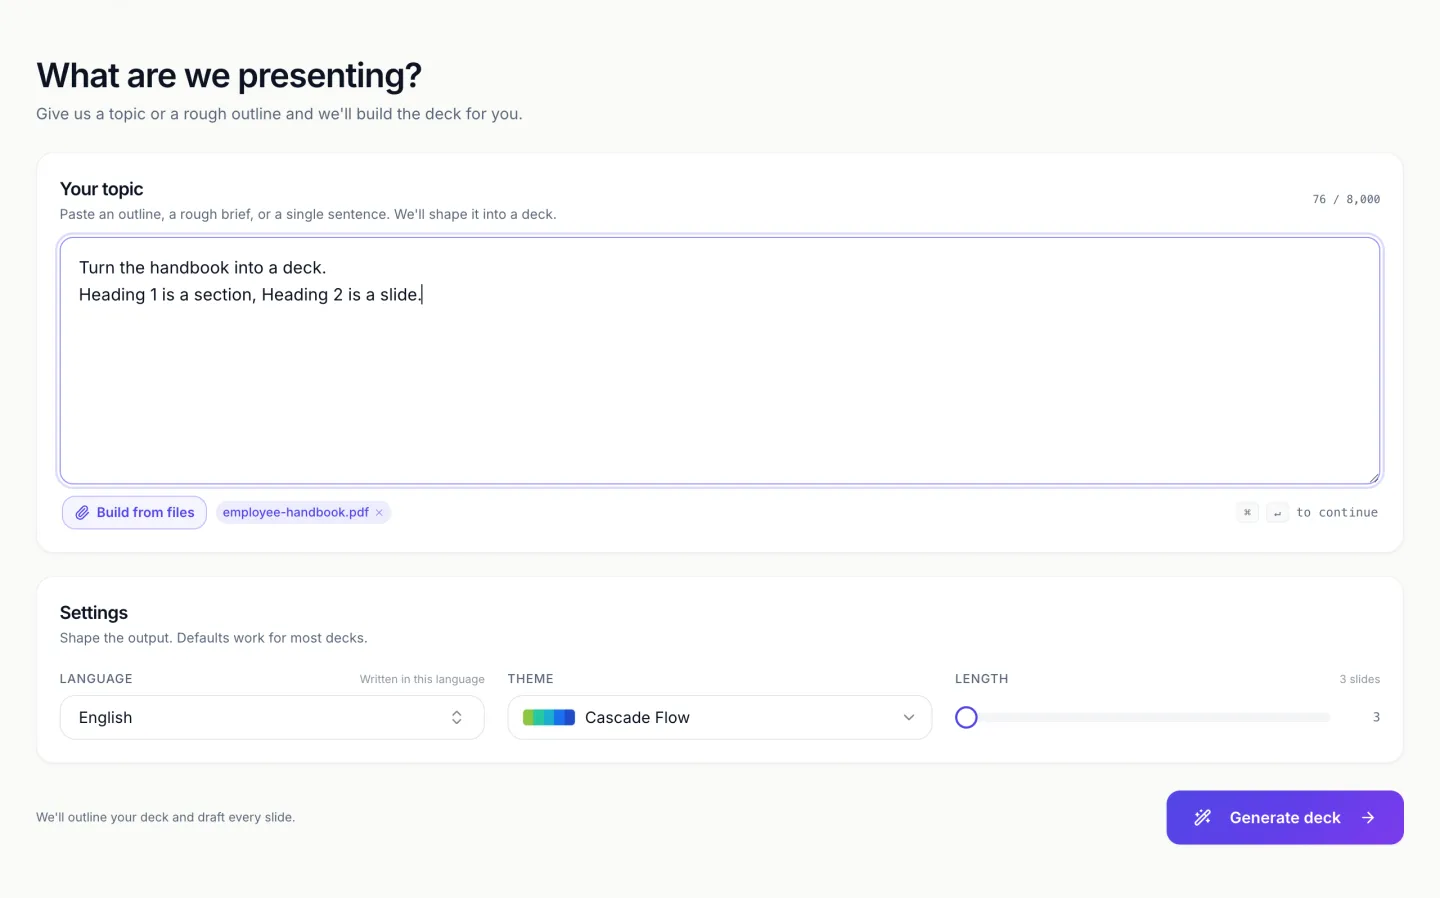
To convert a Word document to slides, either save it as a PDF and attach that to the slide generator, or copy the sections you need into the prompt box. A .docx file is not an accepted attachment, so one of those two routes is required. The PDF route gives the planner a summary and key points of the whole document, while pasted text is used exactly as written, and which one you pick decides how close the slides stay to your wording.
Two routes in, read differently
Accepted attachments are PDF, plain text, PNG, JPG, WebP and GIF, so use File then Save as PDF in Word, or print to PDF. An attached PDF is not parsed as text. Its pages are rendered as pictures at about 200 DPI and read by a vision model, which returns the document type, a summary, the topics, the key points and any labelled fields, not a sentence by sentence transcript. Pasting the text into the prompt box is the other route. It holds 10,000 characters, and what you paste is used as written.
Headings still shape the deck
A document that uses real Word heading styles converts better than one where headings are just bold text. On the paste route the heading lines arrive as short lines above their paragraphs, which the planner reads as section breaks. On the PDF route the headings are what the page pictures show as large, distinct type, which is what the read uses to name the topics. If your document was styled by hand, apply Heading 1 and Heading 2 before exporting or copying. It changes the result more than any prompt wording.
Long documents need a slide budget you choose
A 30 page handbook has more sections than a sensible deck has slides. Rather than letting it compress everything into whatever fits, name the number of slides and say what each part should be worth. One slide per major section and a single summary slide for the appendices is a better instruction than asking for a comprehensive deck.
Numbered clauses do not stay numbered
Policy and contract style numbering does not become slide numbering, because slides carry a list slot with its own bullets or numbers rather than a clause tree. On the PDF route clause numbers may not survive the summary at all. If the references matter, paste the clauses rather than attaching them, and say keep the clause numbers in the text, so they are written into each point instead of being lost.
Tracked changes and comments
Accept or reject changes before exporting. A PDF printed with markup visible shows revision balloons and struck out text in the page pictures, and the read has no way to know which version you meant. Copying text with changes still pending carries the same risk into the prompt box. Comments are usually dropped by the PDF export, but deleted text shown with a strikethrough is not.
Which route for which document
Use the PDF route for a long document where the deck should summarise, such as a 30 page handbook turned into a twelve slide induction. Use the paste route when the wording carries weight, such as policy statements, agreed definitions or a short proposal. The two combine well: attach the PDF for the whole picture and paste the two or three passages that must survive word for word, marked keep exactly. A screenshot of a single page also works, because images are transcribed verbatim.
How it works, in three steps
Step 1
Clean up in Word
Apply heading styles, accept tracked changes, and remove the cover sheet if it is only administrative.
Step 2
Save as PDF, paste the key passages
Attach the PDF with Build from files, up to five files at 25 MB each, and paste any wording that must survive exactly.
Step 3
Name the slide count and the sections
Say how many slides and which headings deserve their own. That is the instruction that stops a handbook becoming mush.
The full walkthrough with screenshots is in the guide Turn a document into a presentation.
Limits worth knowing
- Word files are not an accepted upload type. Only PDF, TXT, PNG, JPG, WebP and GIF.
- Attaching any file needs a Starter plan or higher.
- A PDF is read as page pictures, up to 100 pages, and returned as a summary, key points and fields. At most 50,000 characters of that read are kept.
- Word styling is not carried through. Fonts, colours and table borders come from the deck theme instead.
See it on a finished piece


Questions people ask
Why is a .docx not accepted as an attachment?
The slide generator only takes PDF, plain text and common image files, so Word's own format is refused at the upload button. Save the document as a PDF from Word, which takes a few seconds, or copy the sections you need into the prompt box. Pasting is the better choice for short documents, because pasted text is used exactly as written.
Do Word headings that are only bold text hurt the conversion?
Yes. Bold body text looks like emphasis, not like a section break, so the planner has less to go on when it decides what deserves a slide. Real heading styles make each section obvious on the page and in pasted text. Select each heading and apply Heading 1 or Heading 2 before you export or copy. It takes a few minutes on most documents.
What happens to the document fonts and colours?
They are ignored. The deck takes its typography and palette from the theme you choose, which is what lets one click restyle every slide later. If the deck has to match a house style, pick the closest theme in the generator, then adjust the fonts in the theme panel. A brand kit saved on your account also appears in the theme picker as your own palette.
My Word document is 60 pages. What is the best way in?
Export only the chapters you want to present, rather than the whole file. The PDF is read as up to 100 page pictures and returned as a summary and key points, so a whole handbook produces a thin deck about everything. A 10 page chapter gives the read far more room per idea. Then set the slide count to roughly one slide per main heading.
Do tables in a Word document come across as tables?
Not reliably through the PDF, because the read reports key points and fields rather than copying a grid cell by cell. For a table that must arrive complete, paste its rows into the prompt box, or screenshot the table and attach the image, which is transcribed word for word. Then make sure the slide it lands on has a table layout, or drop a table element onto it.
Will speaker notes be written from the document?
Yes, speaker notes are written for every slide as part of generation, and they draw on the same material as the slide copy. They are stored per slide and shown in the notes pane and present mode, but they are not included in the PDF or PowerPoint exports. Anything a presenter must say word for word should be pasted into the notes by hand.
Make your own presentation
The button opens the generator with this use case already described. Change the wording to match yours, generate, then edit anything you like.
Create a presentation with OneCraftRelated pages
Turn rough notes into a presentation
To turn notes into a presentation, paste the notes into the slide generator as they are and add two lines saying who the deck is for and what you want from them. The planner expands the shorthand into sentences, orders the points into an argument and lays each one out on a slide. Notes are written for the person who took them, so the real work is inferring what the fragments mean, and that is where your two lines help most.
Convert a PDF to a presentation
To convert a PDF to a presentation, attach the PDF to the slide generator, set the slide count and say who the deck is for. The file is read for its content and the content is rebuilt as slides, so this is not a page for page conversion. A report argues in paragraphs and a deck asserts in headlines, which is why the result keeps the facts and rewrites the sentences.
Make slides from screenshots
To make slides from screenshots, attach them to the slide generator with a line saying what each screen is for, and the deck is written from the words they contain. Then place the screenshots themselves on the slides in the builder, because the generator reads a picture and never pastes it. There are two different jobs hiding in this request, and mixing them up is why people are disappointed.
More finished work of this kind is on the presentation examples hub.
Written and checked by the OneCraft team. Last checked .